What is Hugo#
Hugo is a fast and modern static site generator written in Go, Hugo sites can be hosted anywhere, including Netlify, Heroku, GoDaddy, DreamHost, GitHub Pages, GitLab Pages, Surge, Firebase, Google Cloud Storage, Amazon S3, Rackspace, Azure, and CloudFront and work well with CDNs. For more information, check the official website here.
What is GitHub Pages#
GitHub Pages is a static site hosting service provided by GitHub. For more information, check the official website here.
What is GitHub Actions#
GitHub Actions automate your software workflows with CI/CD. It can build, test, and deploy your code right from GitHub. Check more details here.
Install Hugo onto your local machine#
For Windows 10/11:
You can easily use download the binaries from latest release page.
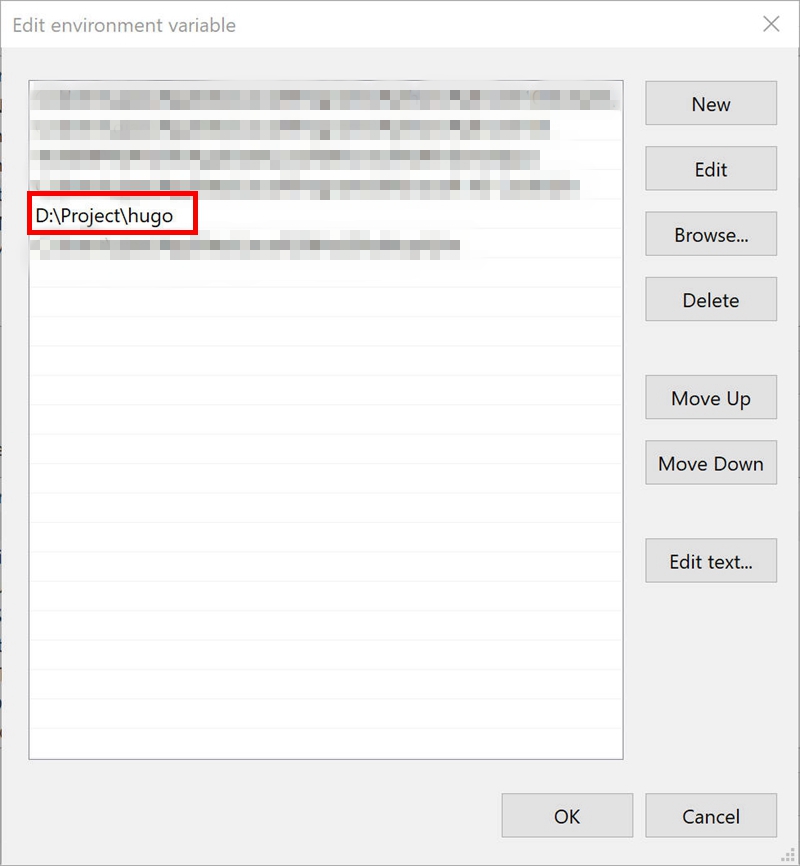
Move the executable to your desired directory.
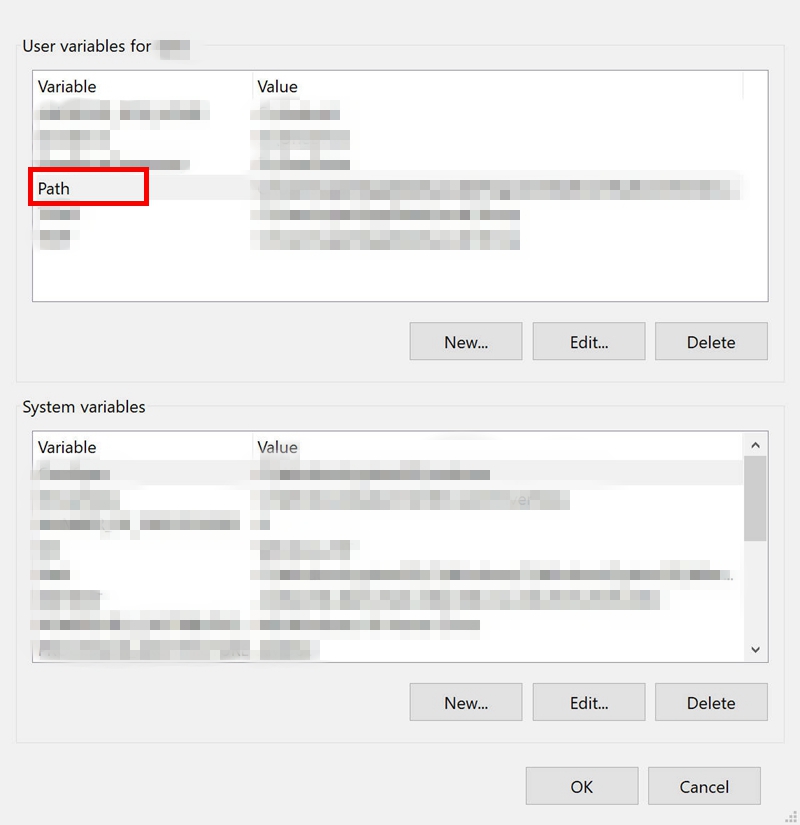
Add this directory to the PATH environment variable.
Go to Control Panel - System and Security - System - Advanced system settings: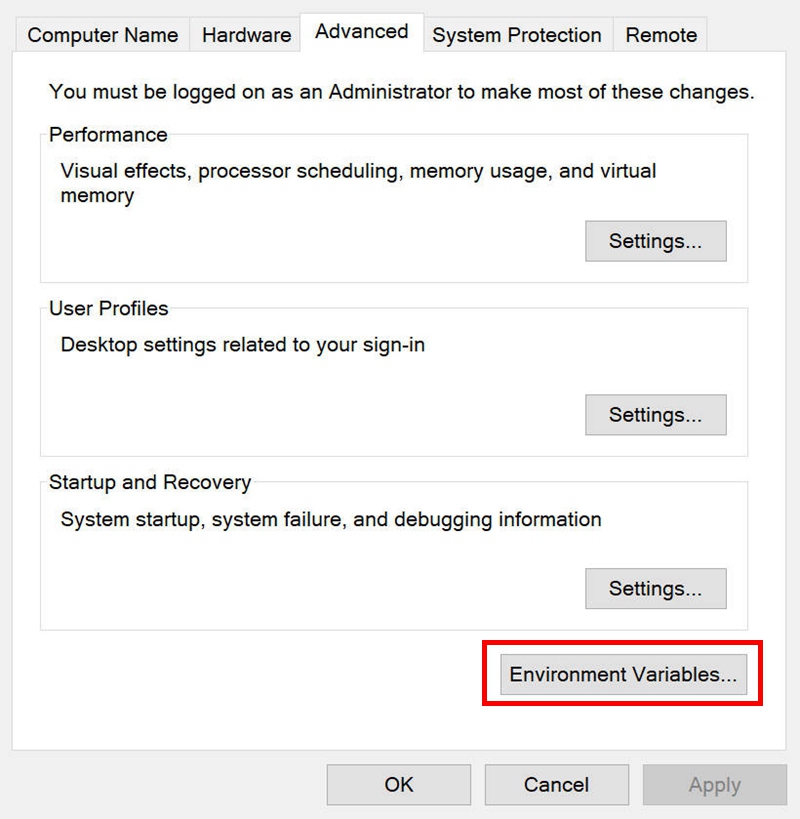
Go to terminal, and check if Hugo installation is successful. run
hugo version, and you should see:
For other installation methods on Windows, MacOS, and Linux, check Hugo installation documentation here.
For the basic usage of Hugo CLI, check here.
Create Hugo site#
Go to your working folder, and create your Hugo site by the command hugo new site your-site-name. ( For instance, my working folder is D:\project. )
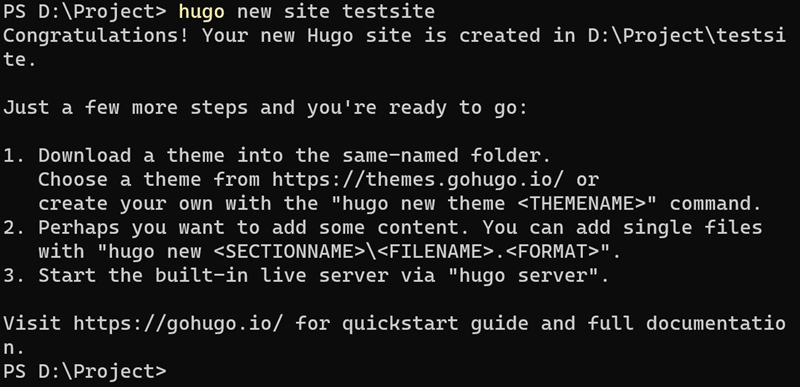
The tree view should be:
your-site-name
├─ archetypes  # the templates of Markdown articles
├─ assets  #  files that Hugo Pipes needs to process
├─ content  #  website contents
├─ data  # available data files when generating a website
├─ layouts  # available templates when generating a website
├─ static  # static files, such as pictures, videos, CSS, etc.
├─ themes  # the hugo theme you choose
└─ hugo.toml  # configuration file
Install Hugo theme#
The Hugo community has numerous themes, Check them here. Normally, the theme documentation will give details about its installation and configuration.
Install using git
Ensure you have Git installed on your local machine. Change into the directory for your Hugo website (that you created above), initialize a new git repository, and add your chosen theme as a submodule. Here we use the theme blowfish as an example.
cd your-site-name
git init
git submodule add -b main https://github.com/nunocoracao/blowfish.git themes/blowfish
Install manually
Download the latest release of the theme source code from GitHub, extract the archive, rename the folder to the name of the theme (blowfish here), and move it to the
themes/directory inside your Hugo project’s root folder.
Normally there is an exampleSite folder inside your themes/YourChosenTheme, which is a demo site of your chosen theme. You can copy this folder to your site folder, then do the configuration based on this example site. Check the configuration docs provided by the theme for more details. Remember to change the baseURL and chosen theme name in Hugo.toml.
baseURL = "https://<yourname>.github.io/" # the URL of your GitHub Pages repo. See below (Create GitHub repositories).
theme = "YourChoosenTheme"
Set up Favicons#
Favicon, known as a shortcut icon, website icon, tab icon, URL icon, or bookmark icon, should be placed in the static/ folder as follows. You can generate them using favicon.io.
static
├─ android-chrome-192x192.png
├─ android-chrome-512x512.png
├─ apple-touch-icon.png
├─ favicon-16x16.png
├─ favicon-32x32.png
├─ favicon.ico
└─ site.webmanifest
Create contents#
You can create new folders in content folder. The tree view can be:
content
├─ about.md
├─ posts
|   ├─ firstpost
        ├─ photo.jpg
|   |   └─ index.md
|   └─ secondpost.md
└─ projects
    ├─ first.md
    └─ second.md
You can create .md files manually in the respective folder. Or use the command below to create a new article. This markdown file uses the template inside archetypes folder.
hugo new content_type/content_name.md
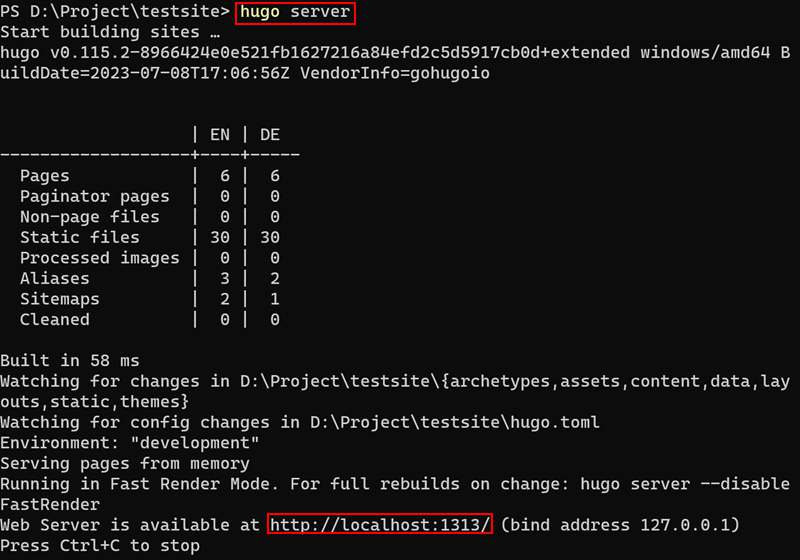
Local run, debug and publish#
Use the command below to run locally. When successful, preview your website via http://localhost:1313.
hugo server
hugo command can generate the static Website in HTML stored in public folder by default. You can publish this static Website to your hosting server.
hugo
In order to build and publish the website automatically, we will use GitHub Pages and GitHub Action later.
Create GitHub repositories#
Two repositories need to be created here. One is the source code repo, another is GitHub Pages repo.
GitHub repo for source code
This repo can be private. You can make any name for this repo.
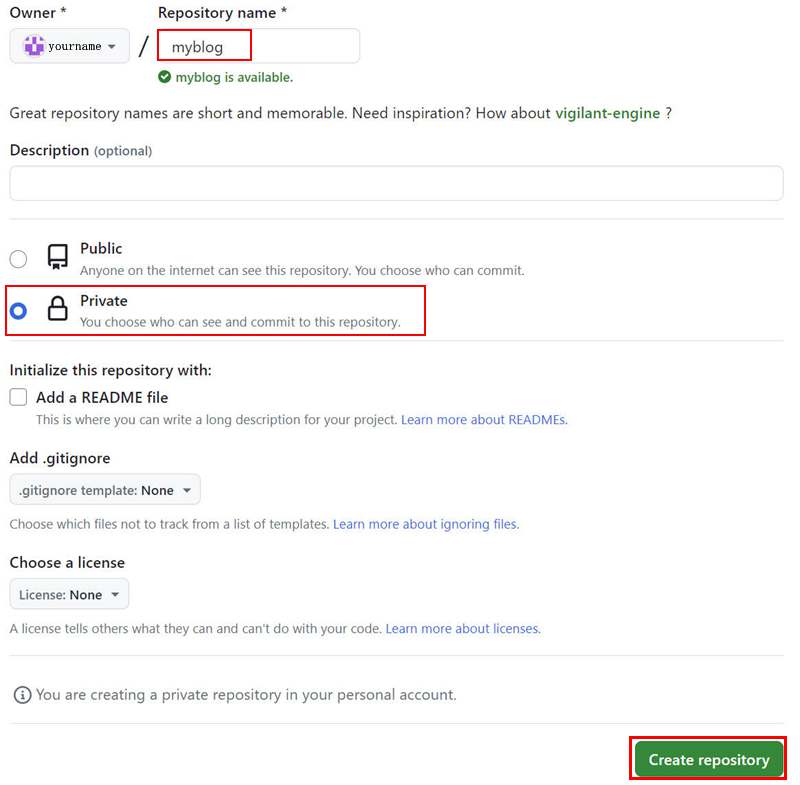
Upload your local project to this repo:
cd your-site-name
git init
git add .
git commit -m "first commit"
git branch -M main
git remote add origin https://github.com/yourname/myblog.git
git push -u origin main
GitHub pages repo
This repo is used to host the static HTML files (the files in the
publicfolder generated byhugocommand). The repo name must be<yourname>.github.io.<yourname>is the user name of your GitHub account. It must be public. Don’t forget to chooseAdd a README file, which will setmainas the default branch.
Automatically deploy to GitHub Pages using GitHub Actions#
In your site folder, create .github/workflow/gh-pages.yml. The tree view can be:
your-site-name
├─ .git
├─ .github
│   └─ workflows
│       └─ gh-pages.yml # create here
├─ archetypes
├─ assets
├─ content
├─ data
├─ layouts
├─ resources
├─ static
├─ themes
└─ hugo.toml
Below is the Sample configuration of gh-pages.yml:
name: github pages # Take any name you want
on:
push:
branches:
- main # When push happens in main branch, run the jobs below
jobs:
deploy:
runs-on: ubuntu-20.04 # runtime environment
steps:
- uses: actions/checkout@v2
with:
submodules: true # Fetch Hugo themes (true OR recursive)
fetch-depth: 0 # Fetch all history for .GitInfo and .Lastmod
- name: Setup Hugo
uses: peaceiris/actions-hugo@v2 # the action provided by Hugo
with:
hugo-version: 'latest' # Fetch the latest version of Hugo
extended: true
- name: Build
run: hugo --minify # Build the static website
- name: Deploy
uses: peaceiris/actions-gh-pages@v3
with:
external_repository: <yourname>.github.io # the repo you want to publish to
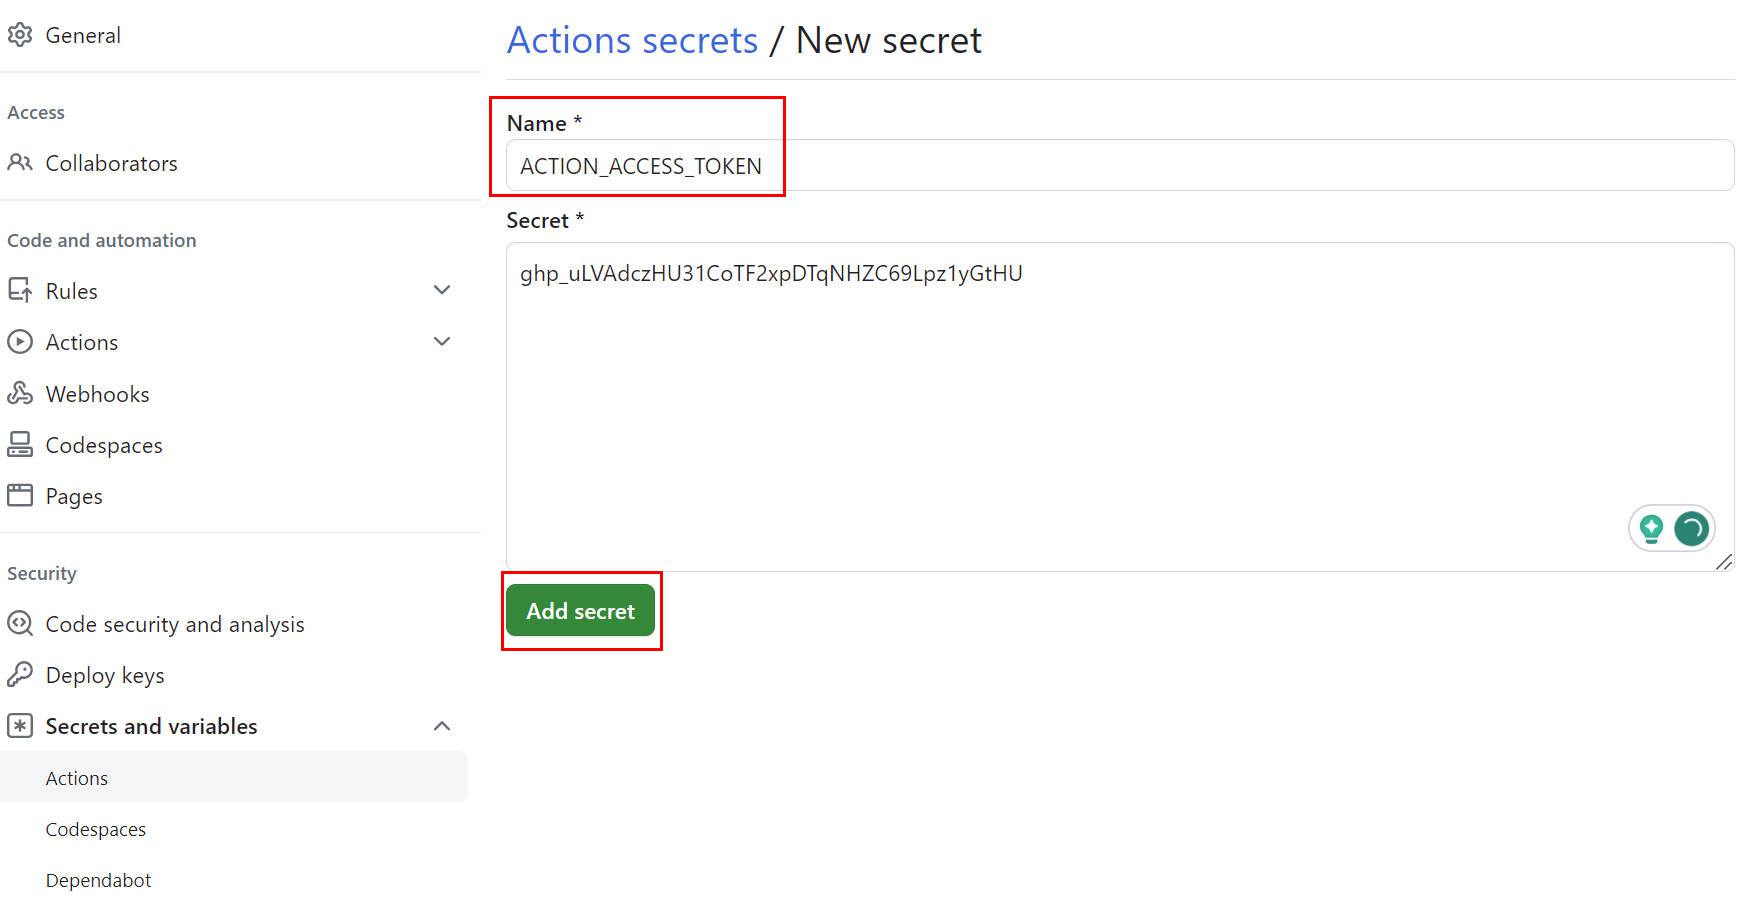
personal_token: ${{ secrets.ACTION_ACCESS_TOKEN }} # Provide your personal access token
publish_dir: ./public # the folder you want to publish. Hugo generates the static Website in `public` folder by default
publish_branch: main # the branch of the repo above you want to publish to
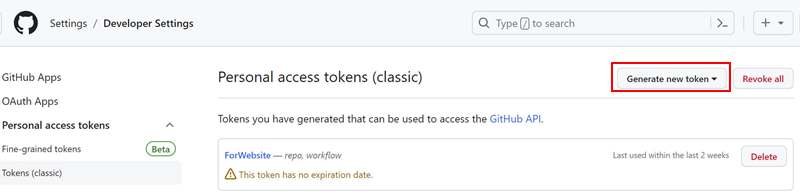
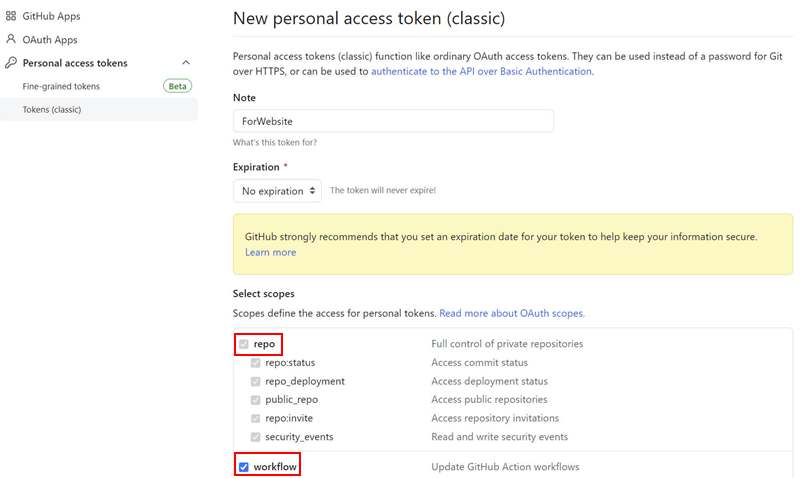
You need to get permission since you will push the GitHub Pages repo from the source code repo. Go to your GitHub account: Settings-Developer settings-personal access tokens, Create a Token here. Notice the name of the token should be the same as personal_token in gh-pages.yml above:
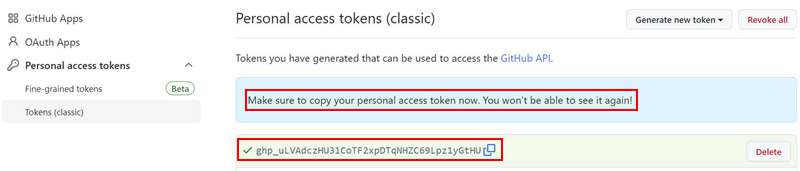
Copy this generated Token (only show once), and go to your source code repo Settings - Secrets and variables - Actions-New repository secret:

When finish all these configurations, push your code to your source code repo. It will trigger GitHub Action, generate the static websites, and push to your GitHub Pages repo automatically.
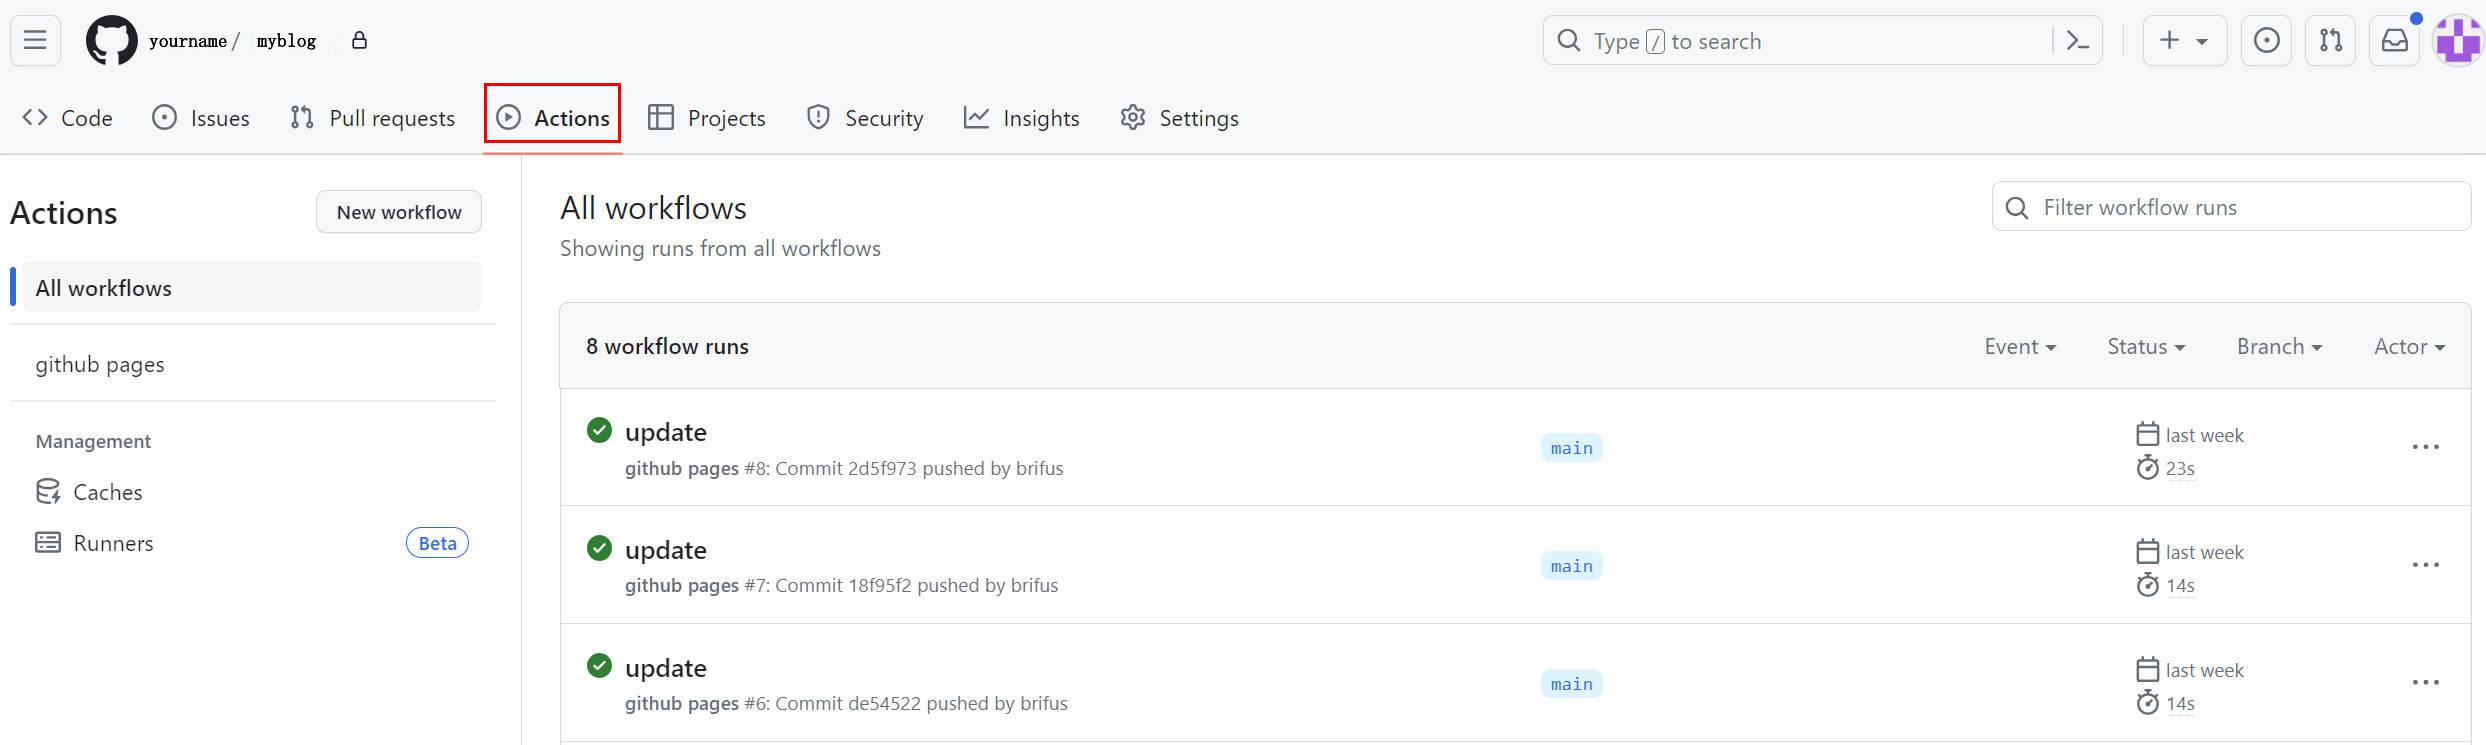
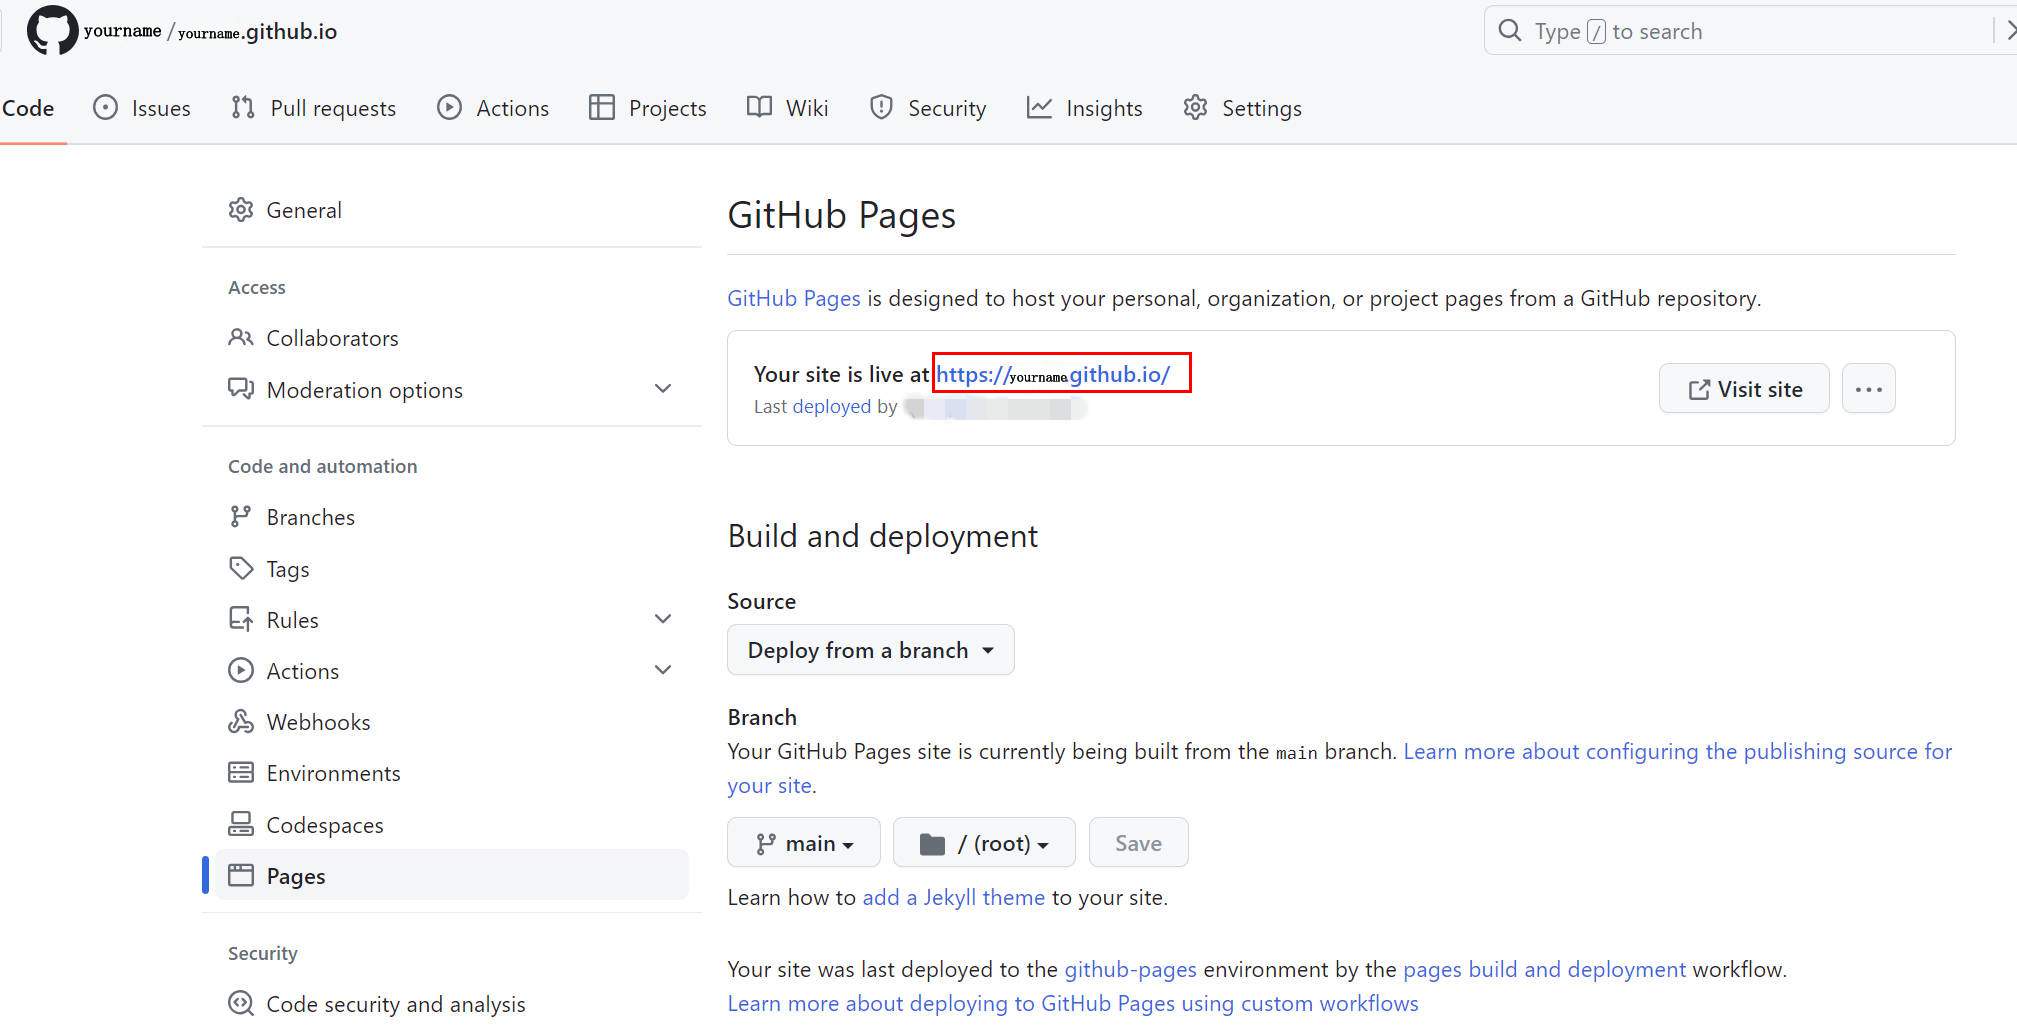
The update of GitHub Pages repo will trigger the CI deployment automatically. After 1-2 mins, you can check your website via https://<yourname>.github.io.
Set up a custom domain#
You can use your own domain for this GitHub Pages website.
Change the
baseURLto your own domain inHugo.toml.baseURL = "https://www.your-domain.com/"Change the URL in the GitHub Pages Repo,
Settings-Pages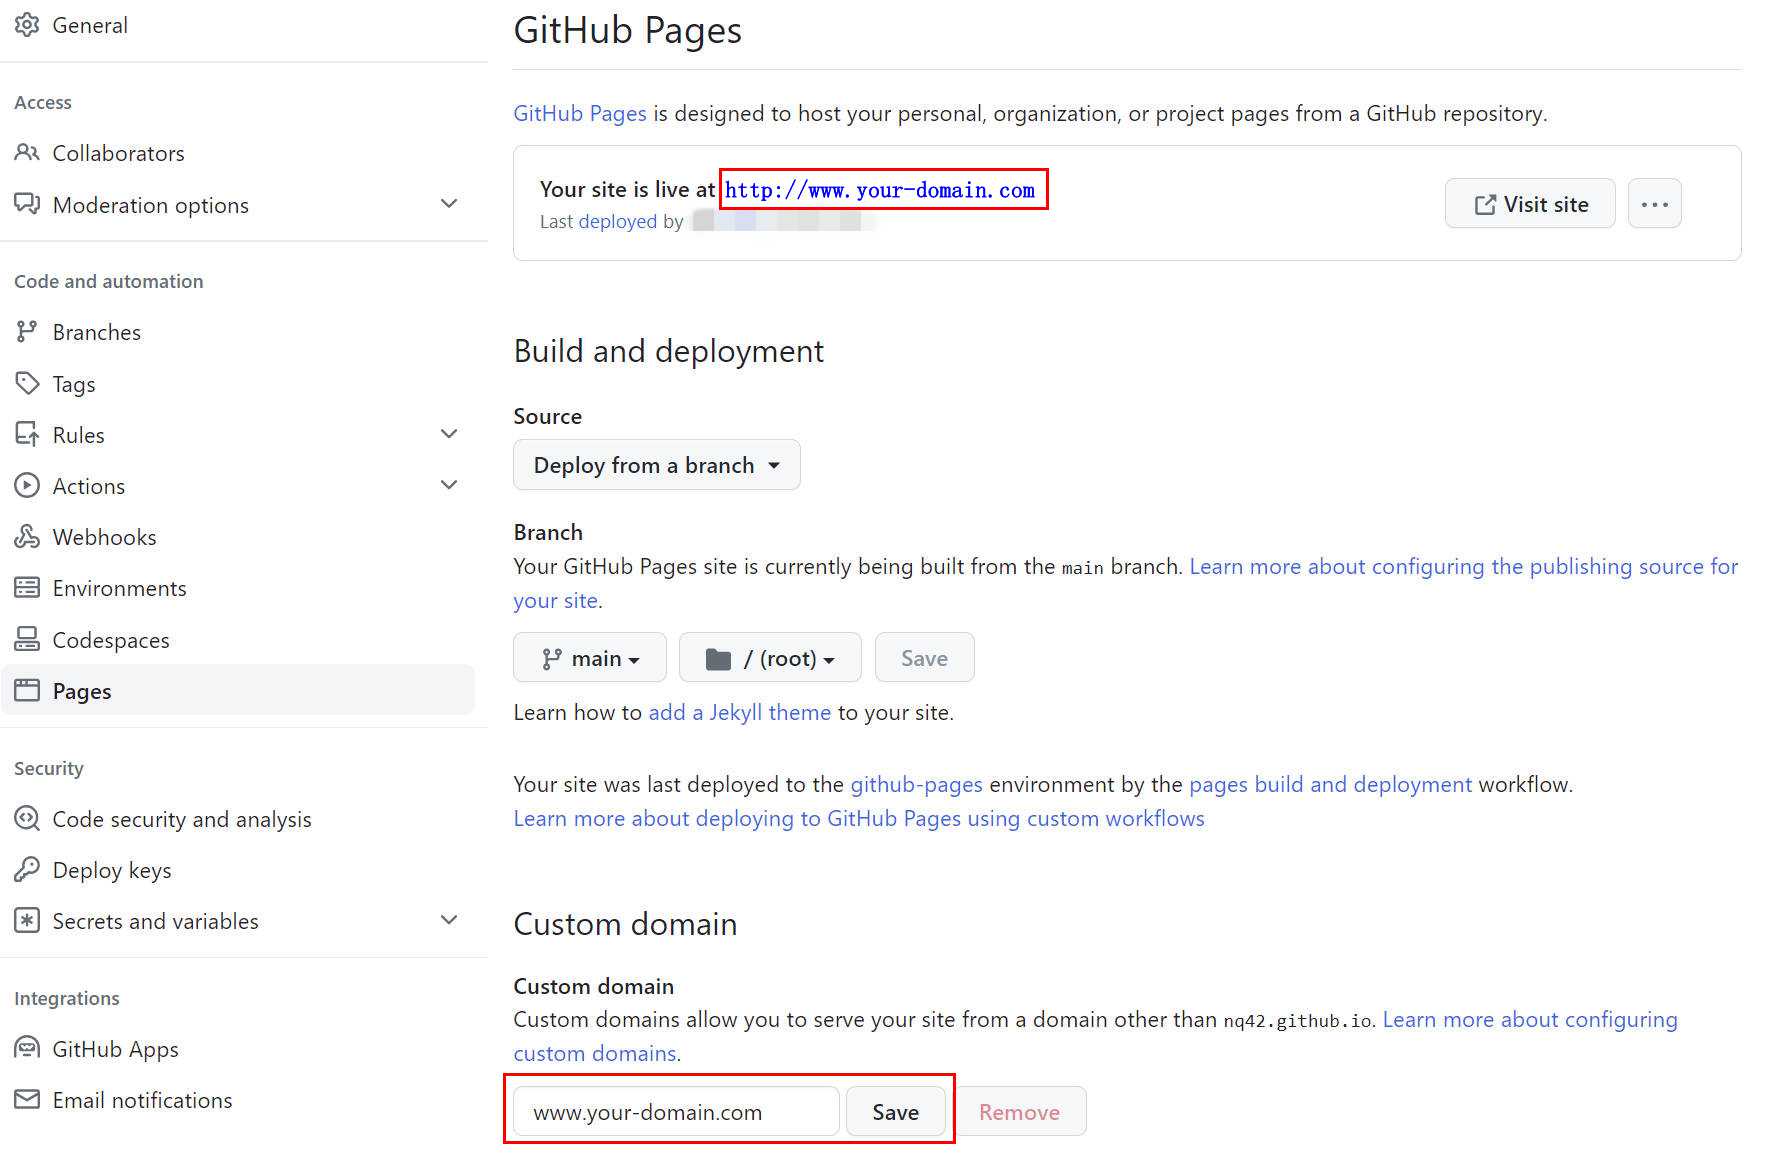
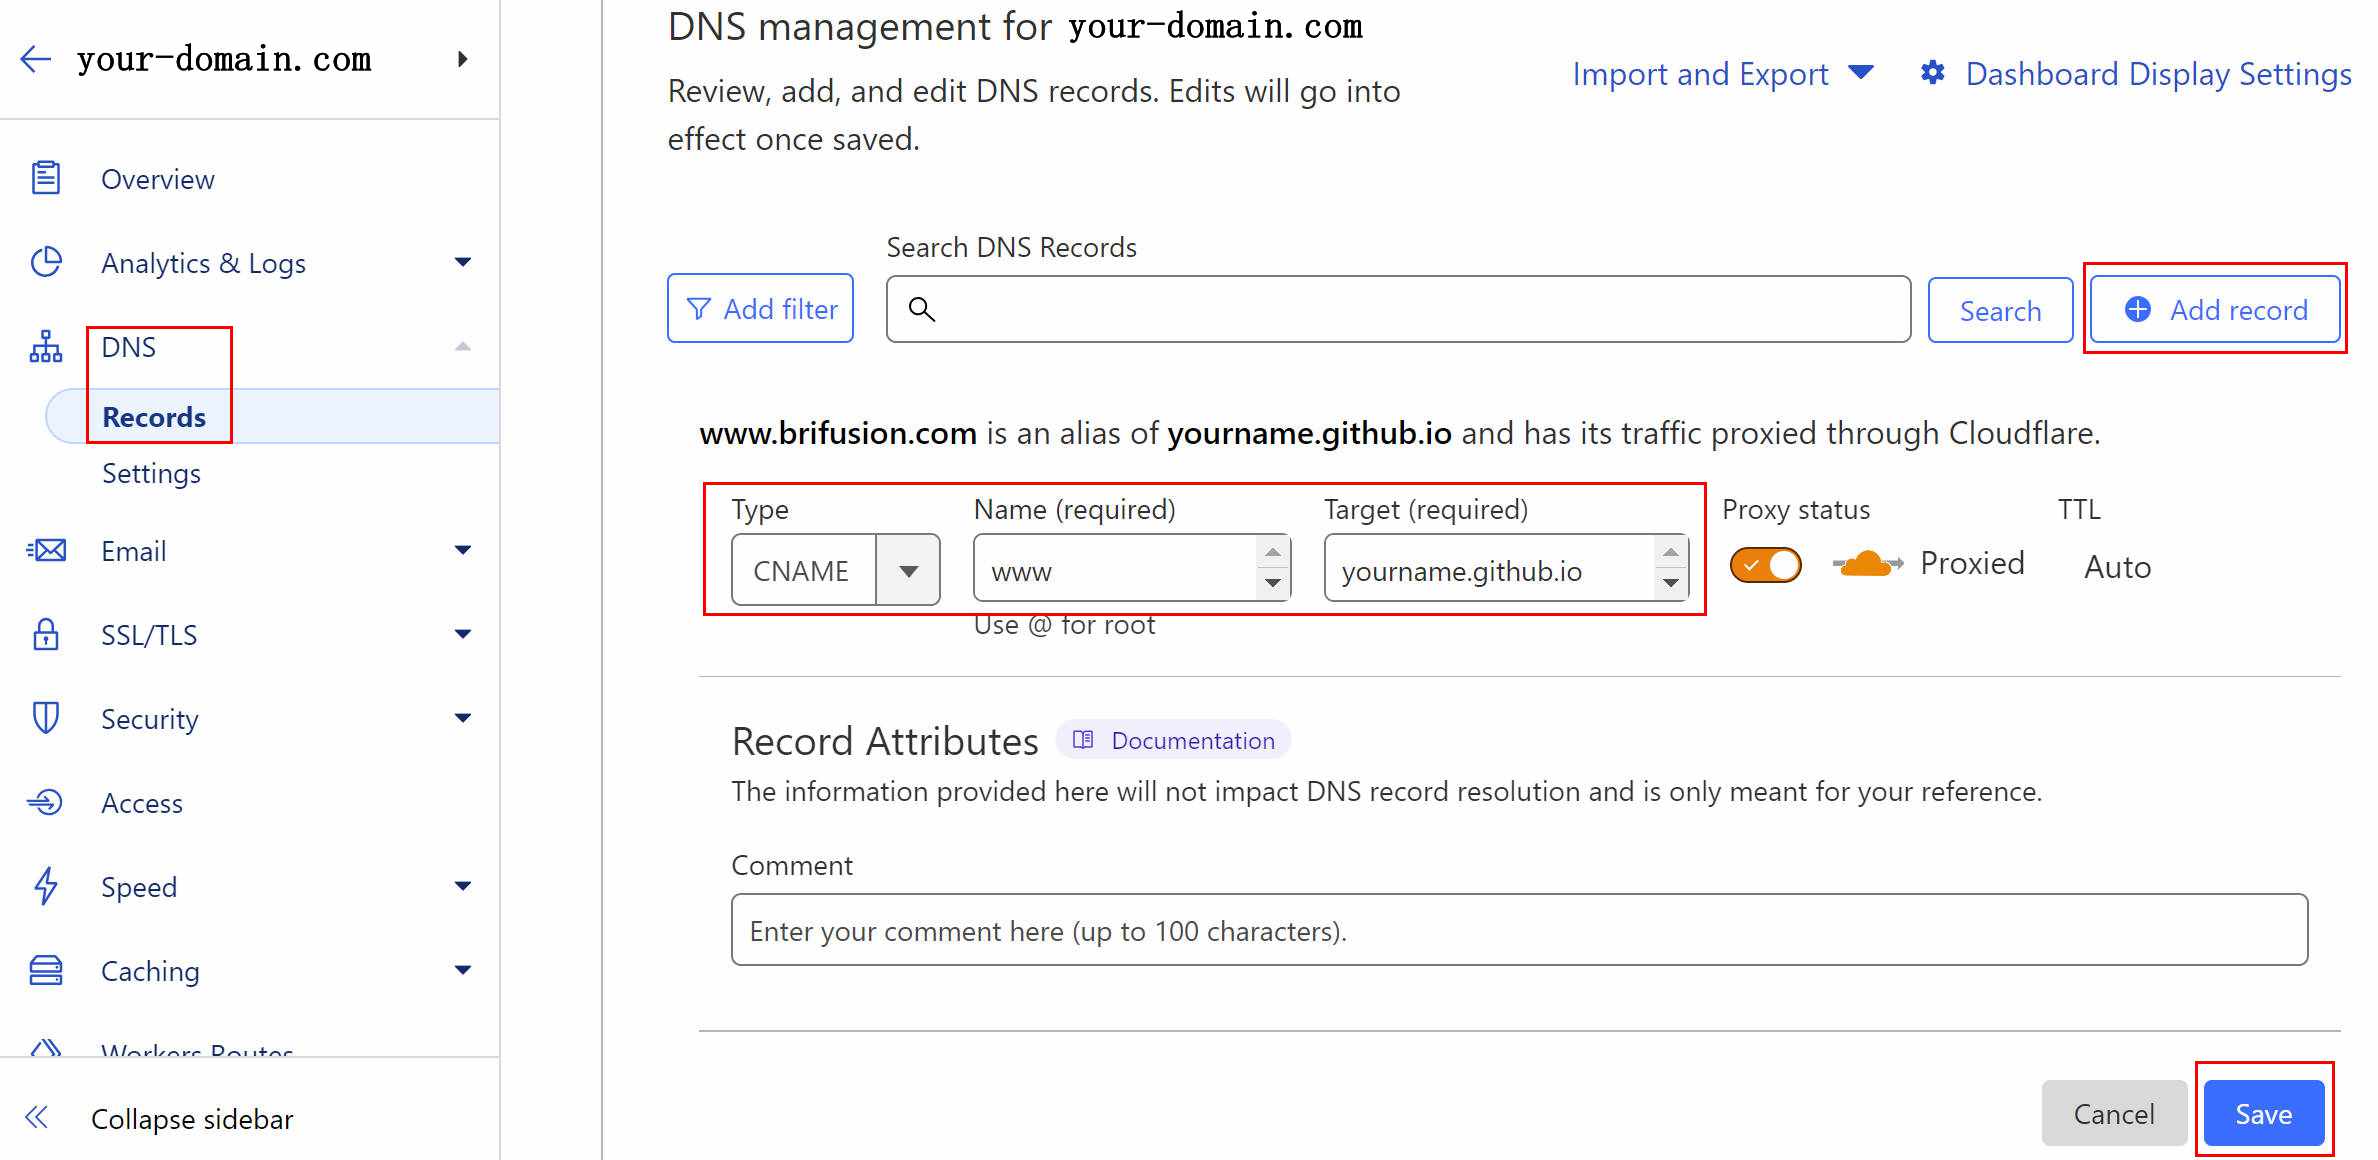
Now, go to your domain host to configure DNS. Here I use Cloudflare as example. Add one CNAME record pointed to your GitHub Pages repo.
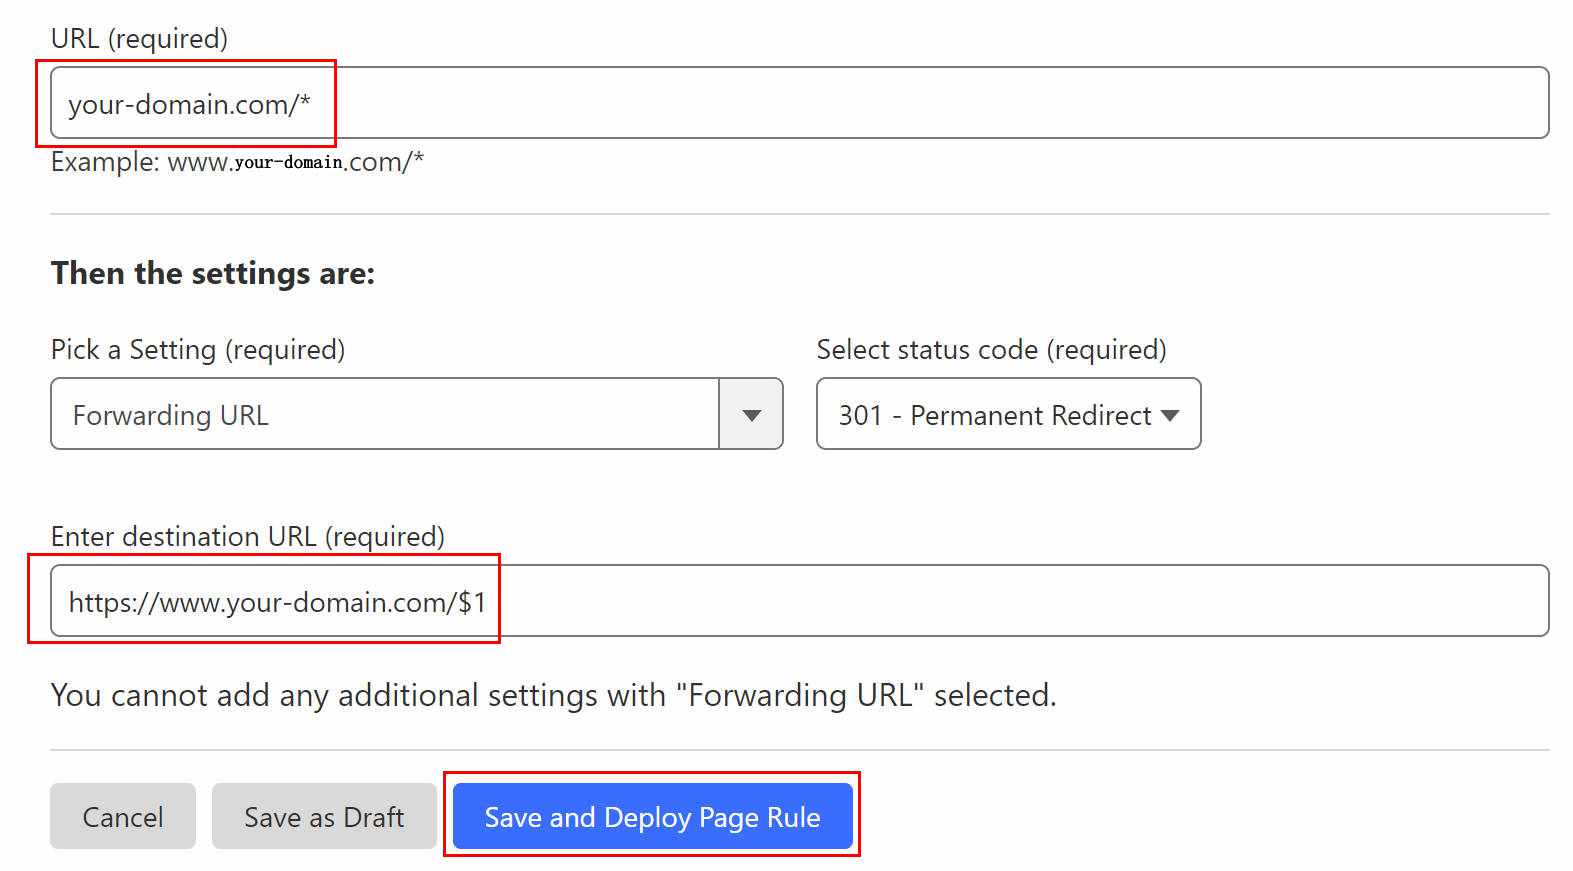
Then go to Page Rules to add one rule for redirect. Page Rules - Create Page Rule:
Till now everything is done. After you update your code, wait for several mins, you can visit your website via your own domain.
In addition, if you want to integrate a contact form, please read: